Exploring AlwaysOn Availability Group Template in Azure


This is one of those posts which is due for a long time. I was really excited when Microsoft announced the release of an AlwaysOn AG template for the Azure Portal back in August 2014.

I had decided to explore this AG template soon after the launch, and this post will explain how easy it is to deploy a 2 node AlwaysOn AG deployment in Azure. Trust me, it’s just a matter of few clicks.

Sit back and relax,we are now going to deploy AG in Azure.Here are the steps :

After you login to the Azure portal, you can access the Market Place

AGTemplate1

You will be surprised to see the number of options which are available in market place now.

AGTemplate2

Search for AlwaysOn ( I really hope MSFT will correct this, it should be rather be AlwaysOn AG) in the search box.

AGTemplate3


Choose SQL Server 2014 AlwaysOn and proceed by clicking Create.

AGTemplate4


Enter details for the required fields and also select the details needed for SQL Server settings. For the purpose of this post, I will be choosing default settings for the domain controller,virtual network,storage etc.

AG6

Note : Ignore the warning messages in the picture above.Warning for Resource Group is shown as I already have a RG with the same name.

That’s it, and you click create.

It takes around 40 – 45 minutes for the whole process to complete and once it was completed, I had the below set of virtual machines.

AG5


2 machines for the domain controllers, 1 for the file share witness and 2 for the AG nodes.

Here is a view of the Resource Group and its resources :

AG4

If you login to one of the SQL nodes and open up SSMS, you can see that AG is fully configured and its ready for use.

AG1

Here is the dashboard view and the quorum info :

AG2

AGQ

Conclusion :

Templates are interesting, and this is an excellent way of deploying AGs in large-scale. I’m pretty sure that MSFT will be working more to optimize this, and will add more and features to it.Looking forward to it.

Thanks for reading, and keep watching this space for more.

This one enhancement makes AlwaysOn Availability Group better in SQL Server 2014 !


I keep getting questions on what is improved other than the increased number of secondaries(8 now) with AlwaysOn Availability Group(AG) in SQL 2014. In this blog post  I would like to talk about one major enhancement around the increased readable secondaries availability in SQL Server 2014.

In SQL Server 2012 there is a good chance that your read workloads can be killed during network failures. Typically this happens in a multi subnet environment where you have AG nodes in 2 or more data centers.If network failure results a communication failure between primary and secondary replicas, then the secondaries will go into resolving state.In resolving state, the read workloads are basically killed. (Yes, yet another reason why you need to test your AG deployments)

With SQL Server 2014, there is good news. Read workloads are not impacted during network failures, primary replica down or cluster quorum issues.

Yes, it stays up all the time, and will be serving your read workloads. The replica will be in resolving state, however the databases are still available for your read connections/workloads.

Keep in mind : Read-only routing is not yet supported for this, and you cannot use listener for your reporting workloads.Brent Ozar calls out this in his blog post here.

Lets now walk though this enhancement :

I will be using a 2 node AG setup and the data transfer mode(Availability Mode) is asynchronous.

If I query the DMV sys.dm_hadr_availability_replica_states I can see the replica states.

SELECT role_desc,connected_state_desc  FROM sys.dm_hadr_availability_replica_states

role_desc               connected_state_desc
PRIMARY              CONNECTED
SECONDARY        CONNECTED

Lets double-check if the data transfer is set as asynchronous

SELECT  is_primary_replica, synchronization_state_desc FROM sys.dm_hadr_database_replica_states

is_primary_replica       synchronization_state_desc
0                                  SYNCHRONIZING
1                                  SYNCHRONIZED

Everything looks good, and now lets take down the primary replica.

Note : Dont try this at home ! (I mean production)

Okay, As this is a test instance I really don’t care and what I did was shutdown the SQL Services to take the primary down.

If we query the DMV again, we can see

SELECT role_desc,connected_state_desc  FROM sys.dm_hadr_availability_replica_states

role_desc                connected_state_desc
RESOLVING           DISCONNECTED

And note, there is no entry for primary as we I have taken it down.

Even though the secondary replica is in resolving state, read connections just works.

USE DemoAG
GO
SELECT COUNT (*) AS [TotalRowCount] FROM [dbo].[InsertCount]

TotalRowCount
6886

The secondary database is in NOT SYNCHRONIZING, NOT_HEALTHY state, however its ONLINE.

SELECT synchronization_state_desc,synchronization_health_desc,database_state_desc FROM sys.dm_hadr_database_replica_states

synchronization_state_desc         synchronization_health_desc       database_state_desc
NOT SYNCHRONIZING               NOT_HEALTHY                           ONLINE

Here is a view from Management Studio :

AG Resolving

Conclusion:

Yes, this is a very good enhancement which will make sure your readable secondaries are highly available and I’m pretty sure that this is one of those enhancement which will force you to deploy AGs in SQL 2014 rather than opting SQL 2012.

Thanks for reading and keep watching this space for more !

SELECT INTO Improvements in SQL Server 2014 !


SQL Server 2014 is a great release with high performance features like In Memory OLTP, Updatable Column Store Indexes etc.

These features still remains as the top favorite and the most compelling reasons for organizations to do an upgrade, However SQL Server 2014 also includes very small but very relevant and useful enhancements, and this post talks about one of those enhancement:

SELECT INTO now runs Parallel !

MP900386077

When I first heard about this feature my first impression was: What…was it not running parallel before ?

No, SELECT INTO was single threaded all these years and with SQL Server 2014 this will now use multiple threads.

Let’s do a quick walk-through of this enhancement.

In this walk-through we will use a table named MasterData which has around 12 million rows.

--Select Count
 SELECT COUNT(*) AS Row_Count FROM [dbo].[MasterData]

Row_Count
11,999,880

Data from this table will be copied over to a different table named MasterData_Copy using SELECT INTO operation.

--Turn on Actual Execution Plan
 SET STATISTICS TIME ON
 GO
 SELECT * INTO [dbo].[MasterData_Copy] FROM [dbo].[MasterData]

This operation was completed in 6 seconds (Desktop class machine) and if we examine the execution plan we can observe parallelism.

SELECTINTO1

And the distribution of row’s among multiple threads:

SELECTINTO2

Now let’s make this little more interesting. We will change the database compatibility level to SQL2012(110) and see what impact that brings to the SELECT INTO operation.

--Change Database Compatibility
 ALTER DATABASE SELECTINTO_Demo SET COMPATIBILITY_LEVEL = 110
--Turn on Actual Execution Plan
 SET STATISTICS TIME ON
 GO
 SELECT * INTO [dbo].[MasterData_Copy] FROM [dbo].[MasterData]

This operation was completed in 11 seconds and it generated a serial plan.

SELECTINTO3

And here is the row distribution.

SELECTINTO4

<Update 1/13/2015 2 PM> 

I received a comment from Toni which says “It might be a good idea to set MAXDOP, most likely having 16 threads isn’t the best option”.

I absolutely agree with this and a well tested MAXDOP setting will definitely bring better results and this is something which you have to keep in mind when queries goes parallel.

</Update>

Conclusion:

If you are using SELECT INTO a lot in your environment, then I would highly recommend you to compare and see what improvements you can again out of SQL Server 2014.

SQLCMD and SET QUOTED_IDENTIFIER


Let’s talk about something simple today. You might already be knowing this, but if you haven’t seen/noted this before then this post will definitely help you.

I was working on requirement wherein I had to simulate a workload which will do massive inserts to a table which had computed column. I tested my T-SQL script to create the workload via SSMS and it worked like a gem.

Yay, all good and that’s the end of this post!  No, not really.

Things started little interesting when I used SQLCMD as a test case to call the same T-SQL. I got an error which said:

Msg 1934, Level 16, State 1, Server <Name>, Line 4
INSERT failed because the following SET options have incorrect settings: ‘QUOTED_IDENTIFIER’. Verify that SET options are correct for use with indexed views and/or indexes on computed columns and/or filtered indexes and/or query notifications and/or XML data type methods and/or spatial index operations.

sqlcmd


That’s interesting because my commands worked just great when I used SSMS earlier! What’s wrong with SQLCMD now?

I quickly realized that this has to something to do with query execution options, and cross checked SSMS options.

sqlcmd2


So, SET QUOTED_IDENTIFIER is ON for SSMS connections, cool and that’s the reason why my commands where running cool earlier.

I quickly checked books online article for sqlcmd and found this. [Well, this is a very good article which is written for sqlcmd by those technical writers at Microsoft]

sqlcmd3

So, adding -I to sqlcmd as a query execution option fixed my problem.

sqlcmd4

Conclusion: 

Little tips and tricks like these always surprises me when I’m dealing with SQLServer, and it helps me learn something or the other daily.

Thanks for reading and keep watching this space for more. Yep, lot of SQL2014 goodness coming in next few days.

Data Collector in SQLServer 2014 – What’s New !


Today I noticed couple of changes(Neat changes !) for Data Collector in SQLServer 2014. This post is a detailed walk-through of setting up Data Collector in SQL2014. In the walk-through if there is a new feature or change which is specific to SQL2014,then I will highlight that.

As soon as you right click Data Collector and choose Tasks you can see 3 options(This is a change in SQL2014) –

  • Configure Management Data Warehouse
  • Configure Data Collection
  • Cleanup Data Collectors (This is a change in SQL2014)

Lets talk about each option in detail now.

Option 1

The first option will create and configure a Management Data Warehouse.

DataCollector20141

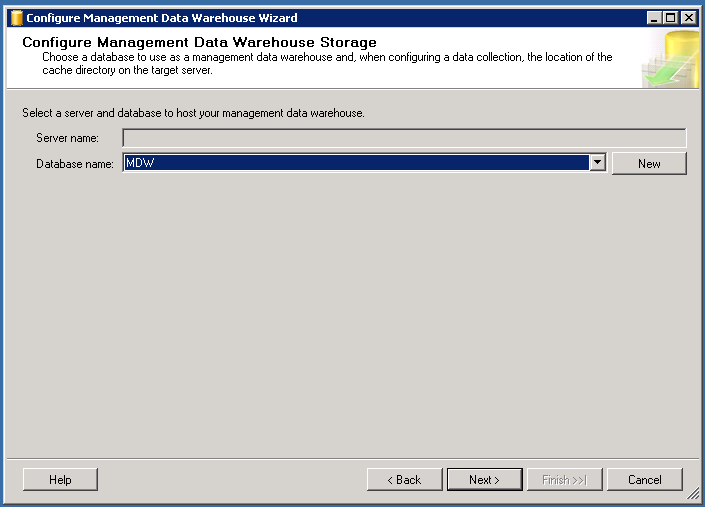
We will proceed by clicking Next and it will take you to the screen which will help you to create/choose the MDW database. I have already created a blank database, so I will select that db in this walk through and will proceed.

DataCollector20142

Next up is to grant permissions to users. Reader role is for reports, writer is for uploading data and admin has all these rights.

DataCollector20143

Final step is to finish the operation.

DataCollector20144

DataCollector20145

Option 2

Configure data collection option helps you start data collection and store collected data to the MDW.

DataCollector20146

This step lets you choose the MDW db,a directory to store the data before its uploaded to the MDW and the collection sets. There are 2 collection sets –

  • System Data Collection Sets
  • Transaction Performance Collection Sets (This is new in SQL2014)

The above selections will create 2 new data collector sets called Stored Procedure Usage Analysis and Table Usage Analysis along with regular 3 data collector sets which was available in the previous versions.

DataCollector20147

Complete the wizard by clicking finish.

DataCollector20148

DataCollector20149

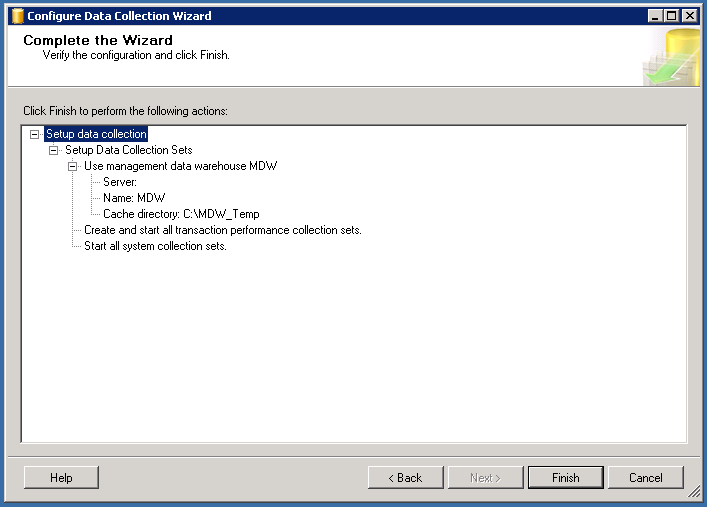
Now that we have configured a MDW and started Data Collection, lets see what happens in the cached folder C:\MDW_Temp

There you go,lot of CACHE files out there and its getting loaded/cleared very fast.

DataCollector201410

 Option 3 – (This is new in SQL2014)

Cleanup Data Collectors is an option which will be enabled after you enabled data collection and this wizard will help you the clean up the collection set.

DataCollector201411

DataCollector201412

DataCollector201413

So as the 1st phase of configuring data collector is now over, we will drill down little more.

If you collapse the Data Collection tree you can see 2 new data collection sets( This is new in SQL2014)

  • Stored Procedure Usage Analysis
  • Table Usage Analysis

DataCollector201414


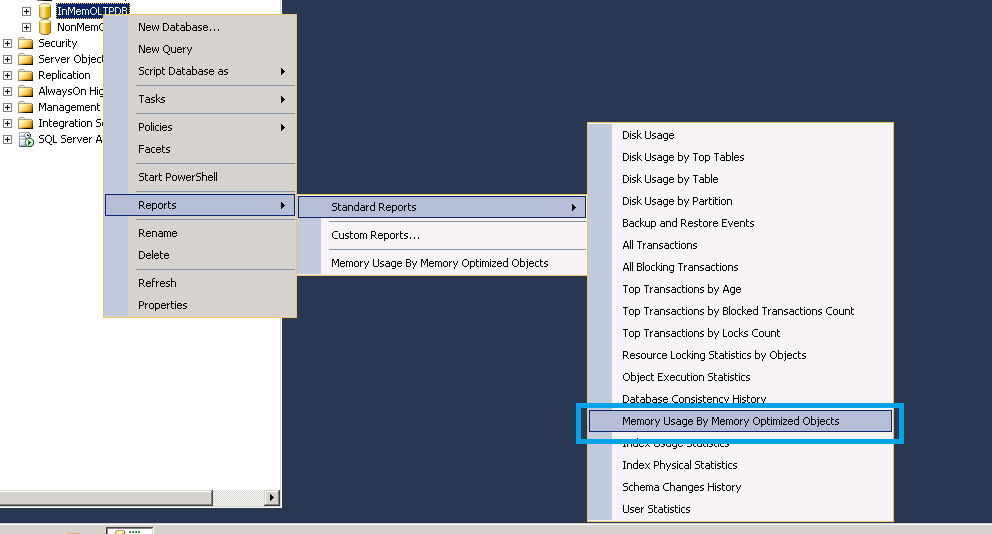
These data collectors are integrated with data collector for a purpose. The data which is collected will provide you with valuable insights on tables and stored procedures which are good candidates to migrate to In Memory OLTP(Hekaton).

I would recommend you to read a great blog post by Benjamin Nevarez(B/T) on this very topic.

Regular data collection sets which were there in the previous versions are also available and its under System Data Collector Sets

DataCollector201415


Lets have a quick look at the reports which data collector offers. These are pretty cool out of the box basic reports and they will help you understand some level of trending.

Query Stats History Report –

This report will give you details of Top 10 TSQL queries and you have the option to rank queries on the basis of CPU, Duration, Total I/O, Physical Reads, Logical Writes. There is also an option to do play back.

DataCollector201416

DataCollector201417


You also have an option to drill down to particular queries to get more details.

DataCollector201418

DataCollector201419

Server Activity History Report –

This is one of my favorite reports. Its tell you about CPU, Memory, Disk, Network usage trends. The report also gives valuable insights about Wait Stats and Server Activity. Again you have the option to drill down for some of the graphs.

DataCollector201420

Disk Usage Summary Report –

This is a great source to know the growth trends.

DataCollector201421 Conclusion

Data Collector is a great feature, and In Memory OLTP being the buzz word, the data it collects can provide you with valuable insights.

Thanks for reading and keep watching this space for more ! (Next up is some cool things about WindowsAzure(Oops !) Microsoft Azure !!!

SQL Server 2014 Install – Step by Step


Hot cake for the day is SQLServer 2014 RTM bits. Its generally available starting today, and I downloaded a fresh copy to start testing it.

I will be writing a separate post on the features I love about SQLServer 2014,but here is the step by step install process for a standalone install.

There are no changes for the GUI based install process when you compare with SQLServer 2012,but one thing I’m pretty sure that the installer is sleek and faster.

Step 1  – The landing page looks pretty similar to the earlier versions, and you can choose the installation tab to get things started.

SQL2014 RTM Install1

Step 2 – Choose the stand-alone install option, and it will take you to the product key page.

SQL2014 RTM Install2

Step 3 – This screen is where you need to accept the license terms. There is also an option to turn on select Customer Experience Improvement Program and Error Reporting.

SQL2014 RTM Install3

Step 4 – 6 These are the steps where Global Rules, Product Updates are checked and Setup files are extracted and installed. If the checks are good, then the install will proceed to the next step automatically.

SQL2014 RTM Install4

Step 7 – Install rules are checked for this step, and I have highlighted a check which was interesting to me.

SQL2014 RTM Install5

 Step 8 – This step provides you with Feature installation options. In this install I will discuss about the first option, ie SQLServer Feature Installation.

SQL2014 RTM Install6

Step 9 –  This step is where you will select the features. I’m choosing only those ones which I need for my testing.

SQL2014 RTM Install7

Step 10 – This step lets you decide if you want to go with Default Instance or a Named Instance.

SQL2014 RTM Install8

Step 11 – This step lets you select the account for the services. I’m choosing all defaults as that’s good for my test lab.

SQL2014 RTM Install9

Step 12 – This step lets you choose the Authentication mode, Data directories, and File Stream options.

SQL2014 RTM Install10 SQL2014 RTM Install11 SQL2014 RTM Install12

Step 13 – Feature Configuration Rules step. As mentioned earlier if the checks are fine, setup automatically proceeds to the next step.

SQL2014 RTM Install13

Step 14 – This is the final step of the installation, and you can pick the ConfigurationFile.ini from the path

C:\Program Files\Microsoft SQL Server\120\Setup Bootstrap\Log\Date_Time\ConfigurationFile.ini

SQL2014 RTM Install14


If everything goes smooth, your install will succeed.

SQL2014 RTM Install15

I’m really excited about some real good features in SQLServer 2014,and I will be writing about them during the next couple of days.

Thanks for reading and keep watching this space for more !


Memory Optimization Advisor – SQL Server 2014 CTP2


SQLServer 2014 CTP2 came with an inbuilt tool called Memory Optimization Advisor which will help you in migrating your normal tables to memory optimized tables.

Where can I find this tool ?

All you need to do is right click the table you want to migrate, and choose the option Memory Optimization Advisor.

MOA1

The tool will launch with a detailed description of what its capable of

MOA2

I decided to play around with this tool, and here are my observations –

Note – This is still CTP, so things can change during RTM/GA phase.

I started of with a normal table named Employee which has 3 Col and 3 rows data on it. Nothing big, pretty simple.

Launched the advisor, and the initial checks were all green. [Be sure to carefully analyze the checks, they are all interesting.]

MOA4

The wizard also has the ability to export a report (Who doesn’t like a report these days !)

I clicked next to proceed, and the wizard gave me some information about the limitations of memory optimized object, and a link which will explain the limitations in detail.

MOA5

I liked these warnings, because its telling me well in advance about the limitations so that I will be more careful on what I’m up to.(Everything has a cost associated with it !)

Next up is some interesting stuff. The wizard is forcing me to select the options for memory optimized objects. I have the option to mention memory optimized file group,name and the file path.

I also have the option to re-name the original table, copy data from the original table to the memory optimized table and a check box to mention if the table needs to be moved with no data durability.(Default being both schema/data durability).

I decided to go with all defaults as this was a test case.

MOA6

One of the other cool option which the above wizard window gave is this value –

MOA7

I presume that this value will be the cost of size in memory which will be needed when the table is moved as a memory optimized object. I might not be right at this point, but I will update this post in case this is not true.

Next screen in the wizard talks about primary key and index creation. I decided to make column ID as the primary key with a NON-CLUSTERED HASH Index and a bucket count of 1024.

MOA8

The final screen provided me a summary of my selections.

MOA9

Yet another cool feature in the wizard is that it allowed me to script everything before I finalize my selections.

I decided to hit Migrate, and wanted to see how it goes.

Viola,all clean and green !

MOA10

The wizard was smart enough to rename the old table,and created a memory optimized one for me.

MOA11

MOA12

I had scripted out everything before hitting migrate and that file looked like this –

MOA12_1

Conclusion

This is a very neat feel good to have tool and those warnings and pre-checks will definitely help users to streamline issues well before they are IN MEMORY !

Thanks for reading and keep watching this space for more !

Database Backup Encryption – SQLServer 2014 CTP2


SQL Server 2014 CTP2(All new,shiny shiny !) availability was announced yesterday at #SQLPASS Summit.

CTP2

Native backup encryption is one of the key features which was announced with this release, and I’m sure this feature will be widely used.

Native backup encryption will encrypt the data while creating the backup, and eventually you will end up creating an encrypted backup file. This is one of those features which was only provided by 3rd party tools [Similar to backup encryption].

Now backup encryption is out of the box for SQLServer 2014 !

So,what all are the pre-requisites to get started with this feature –

1.  You will need either Standard,Enterprise or BI edition of SQLServer 2014.

2. You will need to have a Certificate or a Asymmetric key.

3. You will need to choose the required encryption algorithm.

As we now know the pre-requisites ,lets try to create an encrypted backup and follow the process one by one.

First we will create a master key –

-- Creates a database master key. 
-- The key is encrypted using the password "Pa55word"
USE master;
GO
CREATE MASTER KEY ENCRYPTION BY PASSWORD = 'Pa55word';
GO

 Followed by creating a Certificate

--Creates a certificate.
Use Master
GO
CREATE CERTIFICATE BackupCertificate
 WITH SUBJECT = 'Backup Encryption Certificate';
GO

Once all the keys/certificate requirements are taken care, we will proceed to create an encrypted backup file by specifying the certificate and a backup algorithm. The syntax is pretty simple –

--Create an encrypted backup file.
BACKUP DATABASE RockStar TO DISK =
'C:\SQL2014CTP2Backup\RockStar_Encrypted.bak'
WITH COMPRESSION,
 ENCRYPTION 
 (ALGORITHM = AES_256, SERVER CERTIFICATE = BackupCertificate);

That’s it ! Now we have an encrypted backup file and the result after running the above statement is   –

Warning: The certificate used for encrypting the database encryption key has not been backed up. You should immediately back up the certificate and the private key associated with the certificate. If the certificate ever becomes unavailable or if you must restore or attach the database on another server, you must have backups of both the certificate and the private key or you will not be able to open the database.
Processed 296 pages for database ‘RockStar’, file ‘RockStar’ on file 1.
Processed 2 pages for database ‘RockStar’, file ‘RockStar_log’ on file 1.
BACKUP DATABASE successfully processed 298 pages in 0.045 seconds (51.573 MB/sec).


You might have noticed the warning, it tells you that the certificate is not backed up. Its always recommend to backup the certificate as soon as you create it. [Be safe always !]

Also the algorithm which I mentioned in the above query, ie AES_256 is one among the 4 options available. The rest 3 are  –

AES 128, AES 192, and Triple DES

That’s a simple and straight forward way for creating an encrypted backup file using T-SQL.

GUI also offers this ability and the encryption options are available in the backup options.

BackupEncryGUI

Conclusion  – 

Native backup encryption is certainly a good to have feature and I’m looking forward to test this really well during the next few days.

Thanks for reading and keep watching this space for more.

Monitoring Memory Usage of Memory Optimized Objects – SQL Server 2014


Starting SQL 2014 monitoring memory usage of the memory optimized objects is super important to ensure that your instance don’t run out of memory and cause real bad situations.

One way of ensuring that the memory optimized objects wont utilize a certain amount of memory is by setting up resource governor. This is a great level of control when you have multiple databases running on the same instance and you don’t want memory optimized tables eating up the whole memory.

Is there an easy way to get a quick overview of memory usage of the memory optimized tables in SQL2014?

Yes, you have a real good SSMS report just for this purpose. This one report utilizes DMVs under the hood and provides you with some valuable information.

InmemOLTP Reports

Lets do a quick walk through of what this report gives –

InmemOLTP Reports1

At any point of time I will be interested to see the usage of Table Used Memory counter.

Index Used Memory is based on the bucket count which you mention during non clustered hash index creation.

The query which the report runs under the hood to give you the usage related value is –

SELECT t.object_id, t.name, 
ISNULL((SELECT CONVERT(decimal(18,2),(TMS.memory_used_by_table_kb)/1024.00)), 0.00) 
 AS table_used_memory_in_mb,
ISNULL((SELECT CONVERT(decimal(18,2),(TMS.memory_allocated_for_table_kb - TMS.memory_used_by_table_kb)/1024.00)), 0.00) 
 AS table_unused_memory_in_mb,
ISNULL((SELECT CONVERT(decimal(18,2),(TMS.memory_used_by_indexes_kb)/1024.00)), 0.00) 
 AS index_used_memory_in_mb,
ISNULL((SELECT CONVERT(decimal(18,2),(TMS.memory_allocated_for_indexes_kb - TMS.memory_used_by_indexes_kb)/1024.00)), 0.00) 
 AS index_unused_memory_in_mb
FROM sys.tables t JOIN sys.dm_db_xtp_table_memory_stats TMS 
ON (t.object_id = TMS.object_id)

This query leverages the power of a new DMV dm_db_xtp_table_memory_stats

Conclusion

SSMS reports are great ways to get a quick overview of what is happening, and I expect more and more powerful reports getting incorporated to SQL 2014 during the coming days.

Thanks for reading and keep watching this space for more.

Checkout SQL Server 2014 CTP1 and Windows 2012 R2 preview up in the cloud


You must be really busy spinning up VMs to test SQL Server 2014 CTP1 and Windows Server 2012 R2 preview.

If your on-premise desktop computer/laptop is running low on resources and if you don’t want to take the pain of handling multiple VMs locally,then you have an option to test them out right up in the cloud.

Yes, You can always spin up a Windows Azure VM and do all your testing and shut that down once you are done with your work to save some money.

Sounds like a deal right? Yes, its pretty easy and fast. It takes less than 10 minutes to provision a Windows Azure VM.

Lets look at the options we have in Azure for the test VMs –

1. SQL Server 2014 CTP1 Evaluation Edition on Windows Server 2012

This image will setup SQL2014 CTP1 for you on Windows Server 2012. Once the VM is provisioned and is in running state, you can connect it via RDP to see that SQL Server is ready to test.

VMs

2. Windows Server 2012 R2 Preview

This image will provision a VM for you with Windows Server 2012 R2 preview. You can spin up multiple VMs to do your hardcore testing with Windows.

VMs1

Conclusion

This is indeed a great way to test the latest builds with minimum efforts and you always have the option to shutdown the VMs after use to avoid a heavy bill.

Thanks for reading and keep watching this space for more.