Journey of an On-Premises DB to Azure VM – SQL Server 2014 makes it easier!


SQL Server 2014 is deeply integrated with Windows Microsoft Azure and moving an On-prem database to a Microsoft Azure VM is much easier and seamless now.

This post talks about the journey of a database named “MoveMeToCloud” which is hosted on SQLServer 2014 RTM on-prem instance to a SQL Instance which is hosted on an Azure VM.

Here are the steps (Can’t get easier than this)  –

1. Right click database “MoveMeToCloud” and choose tasks and then Deploy Database to Windows Azure VM (Oops, that named needs to be changed too!)

Move1

2.  As soon as we complete the first step, we will get the intro screen. Pretty straight forward information made available here.

Move2

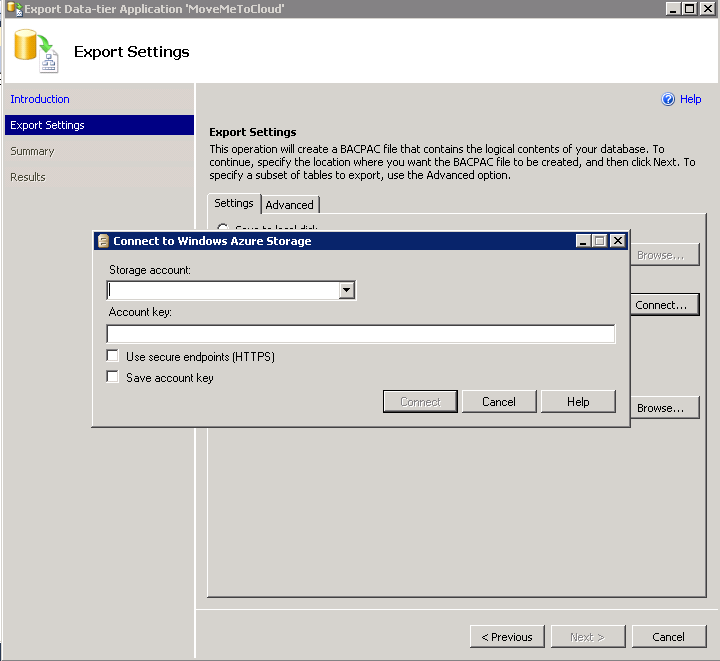
Once we go pass the intro screen we will get the option to connect to the local SQL Instance.  We can then choose the db which we want to move, and also a location for the backup files.

Move3

3. Next up will be security related settings. We will need a management certificate to proceed here.

Move4

By using the Sign in option we can get the required certificate. This is a smart wizard and it will pull the certificate details for you.

Move5

We will proceed by clicking next.

4. Next up is the deployment settings part. This part is little tricky as we will have to do some authentication.

Move6

As you can see in the above screen the Cloud service name, Virtual Machine name and the Storage acct is already available as we have done a sign-in in the earlier step.

We will need to access the settings button to do an authentication again. There should be a VM end point for the specific port for this to work.

Move7

Once the authentication is done, we will get the target database details which will be automatically populated.

Move8

5. Final step is to check the summary and initiate this by saying finish. The wizard will do rest of the job for you.

Move9

Move10


If we check the SQL Instance on Azure we can see the database is available there, Viola !

Move11

Conclusion

This is a very smart wizard and I’m really happy that Microsoft have made great efforts to make this simple to ensure that cloud movements are seamless.

Thanks for reading and keep watching this space for more !

Moving a database from on-premise to the cloud – Step by Step Walkthrough


Cloud is the future and moving there is now as easy as few mouse clicks.

Today we will see how an On-premise database can be moved to a SQL Server instance running up on a Windows Azure Virtual Machine.There are multiple ways to accomplish this and in this post we will see how this can be achieved using SSMS wizards.

Step 1

I have a database named “MoveMeToCloud”,and this is one who is ready to take the flight and move to the cloud. This is a database which is deployed on my on-premises SQL Server Instance.

The first process is to export this database. For that purpose we will choose Tasks —

Export Data-tier Application

Cloudmove1

As always an introduction wizard is opened up, and you can proceed by choosing next.(Also can say do not show this again !)

Cloudmove2

Step 2

In this step we will connect Windows Azure Storage Account and we will export the BACPAC directly to the cloud storage.

Cloudmove3

When we connect the Azure storage account we will need to provide the account name and the key. Manage Access Keys under the Azure portal(Storage section) will get this info for us.

Cloudmove33

Cloudmove4

Step 3

Once the storage account connection is established we can proceed and finish this export activity.

Cloudmove5

The wizard will do multiple checks, and the process will complete eventually(Provided all the conditions are met).

I will talk about the conditions in a different post.

Cloudmove6

Step 4

Once the export is completed successfully we can check and verify that the BACPAC is indeed available under Windows Azure Storage Account

Cloudmove7

Step 5

As the BACPAC is now local to the cloud we can now proceed and do an Import of that file.

We will connect to a Windows Azure Virtual Machine which is running SQL Server 2012 up in Azure to do the import.

We will choose Import Data Tier Application to initiate the import.

Cloudmove8

We will need to provide the storage account details under the import settings

Cloudmove9

Once the connection is established correctly we can proceed and choose the database settings

Cloudmove10

Database settings will allow us to place the data file and log file according to our requirements.

We can proceed and finish the wizard to complete the import activity.

Cloudmove11

Cloudmove12

Step 6

Once the import is completed we are good to access the database up in the cloud.

SSMS Cloud

Thanks for reading and keep watching this space for more.

Check the version of Windows Installer !


This post is a quick tip to find the version of Windows Installer installed on your box.

You might wonder why I ever need to check this version, so here is my small story –

Today I was installing SQLServer 2008 Upgrade advisor for a Windows Server 2003(SP2) box(Pretty old one) and right away got this error –

CopyIssue3

The error message was pointing that the server might be running an old version of windows installer.

I decided to check what was the basic system requirements to install SQLServer 2008 Upgrade Advisor. Oh btw, that check should have been done earlier, but you know these things happen sometimes ! [With a promise not to repeat it later on].

SQLServer 2008 Upgrade Advisor needs Windows Installer 4.5 to work and that’s clearly mentioned in the download page.

WindowsInstaller1

Now I was curious to see what is the version of windows installer which is currently running.

How do I do that? I haven’t bothered to check that in the past too.

Confusedboy

After doing some random search I finally got a simple answer to my question, thanks to http://stackoverflow.com/.

The best and easiest way to check the version is by typing msiexec in Run prompt to get

WindowsInstaller2

This quickly tells you about the version.

I did little more checks to find that there is yet another way to check the version details and that’s by directly checking the .DLL files.

Note – System files should never be modified, moved or deleted.

WindowsInstaller3

The above picture shows the details of Windows Installer version once it was updated to 4.5 which was the basic requirement for SQLServer 2008 Upgrade Advisor.

I know you are now thinking of Windows Installer 5.0,here is that information for you.

The Windows Installer 5.0 is part of the Windows Server 2012, Windows 8, Windows Server 2008 R2, and Windows 7. There is no redistributable for Windows Installer 5.0.

SQL Server 2012 Upgrade Advisor also needs Windows Installer 4.5.

Conclusion

One error helped me to learn something more about windows installer and if you are interested too,then here are some links for you

http://msdn.microsoft.com/en-us/library/windows/desktop/cc185688(v=vs.85).aspx

http://en.wikipedia.org/wiki/Windows_Installer

http://www.advancedinstaller.com/user-guide/msiexec.html

Thanks for reading and watch this space for more.

Next Gen File System ReFS(Resilient File System) and SQLServer !


“ReFS”, this term was absolutely new to me when I was reading this white paper from Microsoft ‘Storage Windows Server 2012’.

ReFS is the next gen file system from Microsoft, and available in Windows Server 2012.

Here are some of the key ReFS benefits and capabilities –

1. Robust disk updating  This avoids problems associated with power failures during disk updates.

2. Data Integrity This ensures detection of all forms of disk corruption and it uses checksum.

3. Availability – Ensures that the whole volume will never go down when there is a corruption.

4. Scalability – ReFS is highly scalable and its a great benefit considering the fact that data demands are getting high and high.

5. Proactive error identification  Scans the volume for errors.

For the complete list and detailed explanation refer the below mentioned white papers and blog posts –

Optimized Storage Efficiency with Windows Server 2012

Windows Server 2012 – Storage

Building the next generation file system for Windows: ReFS


Being a SQLServer professional my next focus was to understand how ReFS is going to benefit my SQLServer configurations, and to my surprise there was no real good news !

Denny Cherry(B/T) has a great blog post on why SQLServer will have issues if we run on ReFS. I would encourage you to read that post now.

This is mainly because some of the NTFS features such as named streams and sparse files are not supported in ReFS. SQL Server uses these features for DBCC CHECKDB and Snapshots.

Without using named streams DBCC CHECKDB will lock objects and this is not a desirable situation from everyone’s perspective.

I personally would like to test these situations and see what all scenarios comes up.I’m setting up an environment for this very purpose and looking forward to come with more details.

Conclusion –

If you are deciding to leverage ReFS for SQLServer deployments, then you would need to think twice and hold on to the decision.